Pulse Oximeter
Pulse Oximeter is a Device which can check the oxygen level and BPM . In This Device main part is Electronic pulse oximeter sensor which can check the Oxygen level and BPM.
And another main part is battery and Microprocessor unit. But some time Marketise pulse oximeter sensor is very cheap na malfunctioned so we try to make Homemade Accurate Pulse Oximeter.
Introduction
In This Covid situation and also the crisis of oxygen, the Doctor 's suggestion is to always check the oxygen saturation level . If the Oxygen saturation level is below 94% please take doctors' suggestions.You can check your blood saturation level by using Marketise pulse oximeter.
But here have a problem most Marketise pulse oximeters have 2% error . In this situation 2% error is most panice. This 2% error is sacrificing your health.
Required Devices
In This project we need Only two item first one any Microprocessor (Such as Arduino UNO, Arduino Nano, Arduino mega etc ) and last one A well priced Pulse Oximeter sensor and some jumper wire.
It is very economical project because normal Marketise Pulse Oximeter price all around 2000/- to 2500/- . Our project cost only all done 1000/- to 1500/-. Download the Arduino exe file on your computer.
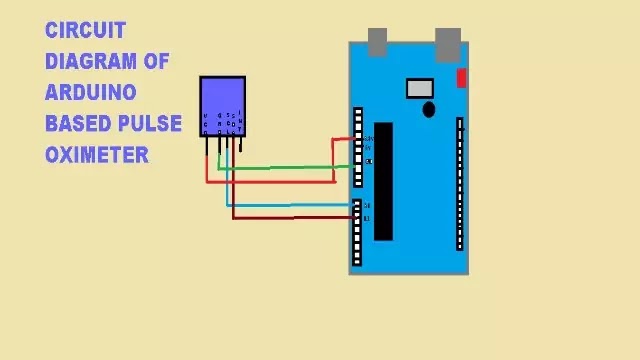
just uploading the code which is mentioned below . And connect the Arduino with the sensor just like the circuit diagram which is mentioned below .
If any problem of understanding just continue reading with the circuit description.
Project Description
Pulse oximeter sensor have five operating pins. Pin names is VIN ,GND , SCL, SDA INT. here INT pin is not workable .
We just work first four pin . Pulse oximeter sensor supply voltage is 3.3 v so VIN connect to the Arduino 3.3 VCC pin .
And Ground pi to Arduino GND PIN . SCLpin connect to Arduino analog input pin A0 and SDA pin connect to analog input pin A1. Now all setup is complete just connect usb cable to your system and upload the code .
Before that the sensor can holding tightly a proper place because small jarking is compromised your result. For best result output in sensor for holding provide two holes . Hold the the sensor with nut bolt.
Result
When you connect the Arduino with system and uploading the code which is completely error less. Then go to serial monitor and check two output first one is bpm and another Oxygen saturation level.
When you take reading the hand holding without any jerking. Because the jerk concider as your bpm so here have some error .
Incase first time ouput with some error so don't panic , check your bpm two or more times there will the correct result. If you check more and more time so contact any medical specialists. And take all the precautions for your good health.
This project Run by this arduino code
----------------------------------------------
Other posts
DC machine single layer winding and double layer winding armature torque equation


![[PDF] Competitive Exam MCQ For Electrical Engineering](https://4.bp.blogspot.com/-O3EpVMWcoKw/WxY6-6I4--I/AAAAAAAAB2s/KzC0FqUQtkMdw7VzT6oOR_8vbZO6EJc-ACK4BGAYYCw/w100/nth.png)


0 Comments